Installation: Azure HDInsight
Overview
The document describes how to deploy ATSD on Azure HDInsight, a fully managed HBase cluster service available on the Microsoft Azure cloud platform.
Requirements
- Azure HDInsight, version
3.6.
Create HDInsight Cluster
Create an HDInsight cluster in the Azure Virtual Network.
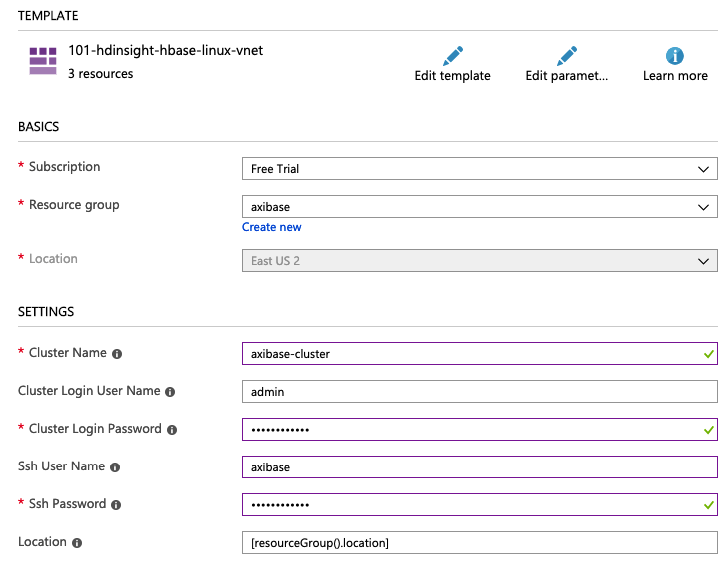
Specify
axibasein the SSH User Name field.Click the Edit Template button. Ensure that
clusterVersionis set to3.6.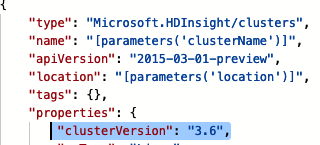
Create ATSD VM
Open the Home > Virtual Machines page in the Azure portal.
Click Add button to create a Linux VM.
Select
Ubuntu 16.04or another supported Linux distribution in the Image field.Select a VM type with
16+gigabytes of memory in the Size field.8GB is sufficient for a test installation.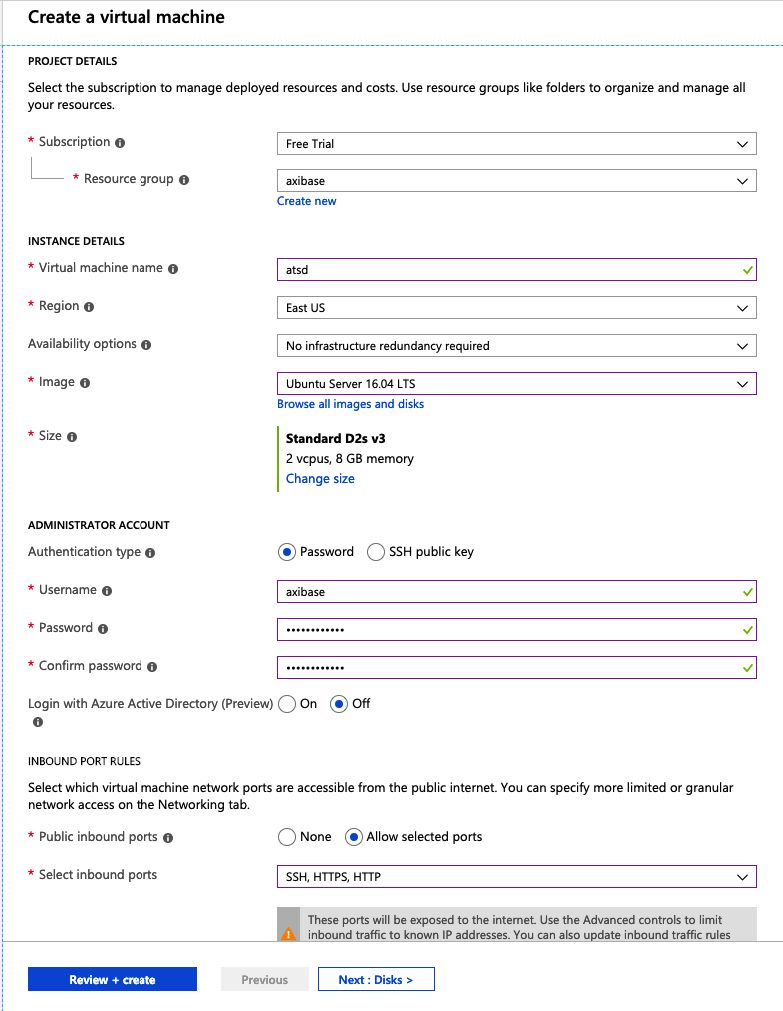
Open the Networking tab and place the VM in the same virtual network as the HDInsight cluster created earlier.

Ensure that SSH port to the ATSD VM is open.

Click Review + Create button and check the settings.

Once the VM is created, open the VM resource page.
Open the Networking page and click Add inbound port rule for ports
8081,8088,8443to ensure that ATSD is reachable on these ports. The ports can be modified if necessary.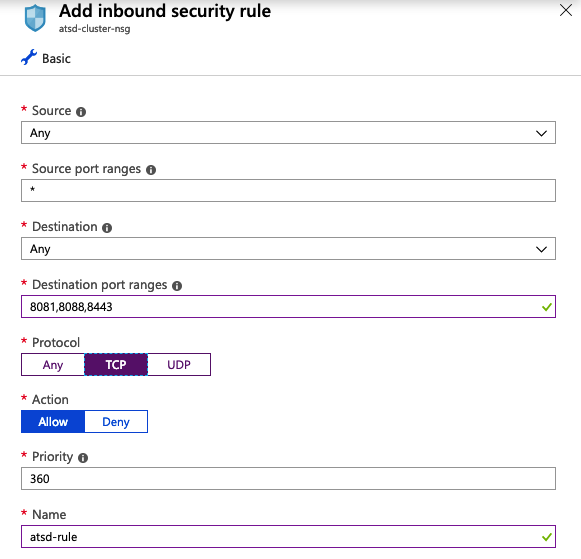
Configure Cluster
Connect to the ATSD VM via SSH.
ssh axibase@atsd_hostnameDownload ATSD distribution files to the ATSD VM.
curl -O https://axibase.com/public/atsd-cluster.tar.gzExtract the archive.
tar xzvf atsd-cluster.tar.gz -C .Lookup the hostname or IP address of an active HDInsight node on the cluster Overview page, for example
192.0.2.1.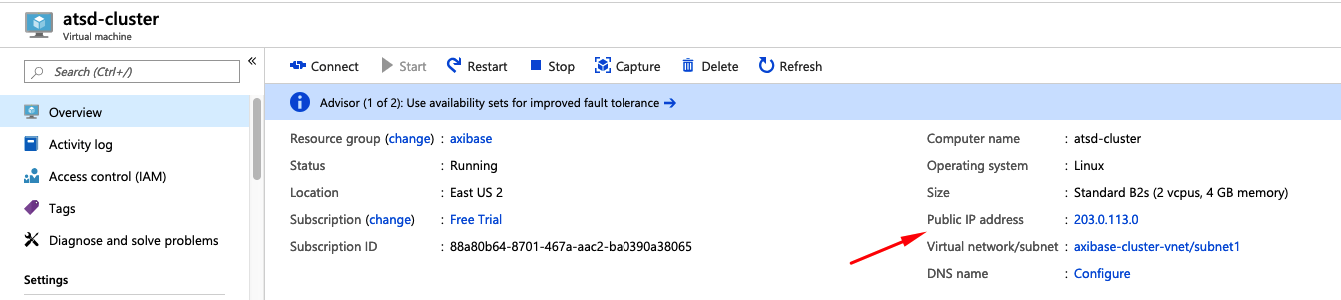
Copy coprocessor file
atsd-hbase.$REVISION.jarfrom the ATSD VM to the cluster VM via SCP.scp ./atsd/atsd-hbase.*.jar axibase@192.0.2.1:/home/axibase/atsd-hbase.jarConnect to the cluster via SSH from the ATSD VM.
ssh axibase@192.0.2.1Copy
atsd-hbase.$REVISION.jarfile into the/hbase/lib/directory in HDFS.- Create the
/hbase/lib/directory in HDFS.
hdfs dfs -mkdir /hbase/lib- Copy
atsd-hbase.$REVISION.jarfrom the local file system to HDFS.
hdfs dfs -put atsd-hbase.jar /hbase/libCheck that the file is present in HDFS.
hdfs dfs -ls /hbase/lib/Found 1 items -rw-r--r-- 1 axibase supergroup 668613 2019-03-11 09:00 /hbase/lib/atsd-hbase.jar
- Create the
Retrieve
hbase.zookeeper.quorumsetting fromhbase-site.xmlconfiguration file. This setting is required for subsequent ATSD setup.cat /etc/hbase/conf/hbase-site.xml | grep hbase.zookeeper.quorum -A1<name>hbase.zookeeper.quorum</name> <value> zk2-axibas.pcilr0ohf5bu3fprrcr3ndmx1d.cx.internal.cloudapp.net, zk0-axibas.pcilr0ohf5bu3fprrcr3ndmx1d.cx.internal.cloudapp.net, zk6-axibas.pcilr0ohf5bu3fprrcr3ndmx1d.cx.internal.cloudapp.net </value>Retrieve
zookeeper.znode.parentsetting fromhbase-site.xmlconfiguration file. This setting is also required for subsequent ATSD setup.cat /etc/hbase/conf/hbase-site.xml | grep zookeeper.znode.parent -A1<name>zookeeper.znode.parent</name> <value>/hbase-unsecure</value>Verify that HBase is available:
echo "status" | hbase shellThe sample output is presented below. Check that the count of dead servers is zero.
HBase Shell; enter 'help<RETURN>' for list of supported commands.
Type "exit<RETURN>" to leave the HBase Shell
Version 1.1.2.2.6.5.3006-29, r1c7fdea305d6153591b318f14cabdb37ef2eb152, Fri Feb  1 02:51:33 UTC 2019

status
1 active master, 2 backup masters, 2 servers, 0 dead, 22.5000 average load
Exit the SSH session with the cluster VM.
Install ATSD
Install JDK 8 on the ATSD VM.
Verify that JDK 8 is installed on the server.
javac -versionjava versionCheck that one of Zookeeper hosts listed in the
hbase.zookeeper.quorumis accessible.ping zk2-axibas.pcilr0ohf5bu3fprrcr3ndmx1d.cx.internal.cloudapp.net64 bytes from zk2-axibas.pcilr0ohf5bu3fprrcr3ndmx1d.cx.internal.cloudapp.net (192.0.2.1): icmp_seq=1 ttl=64 time=0.763 msOpen
./atsd/atsd/conf/hadoop.propertiesfile and set the properties to the values retrieved from the cluster.zookeeper.znode.parent=/hbase-unsecure hbase.zookeeper.quorum = zk2-axibas.pcilr0ohf5bu3fprrcr3ndmx1d.cx.internal.cloudapp.net,zk0-axibas.pcilr0ohf5bu3fprrcr3ndmx1d.cx.internal.cloudapp.net,zk6-axibas.pcilr0ohf5bu3fprrcr3ndmx1d.cx.internal.cloudapp.netOpen
./atsd/atsd/conf/server.propertiesand addcoprocessors.jarsetting.coprocessors.jar=wasb:///hbase/lib/atsd-hbase.jarIncrease Java memory allocation. Open
atsd/atsd/conf/atsd-env.shfile and increase-Xmxsetting to 50% of total physical memory installed in the VM.JAVA_OPTS="-server -Xmx8000M -XX:+HeapDumpOnOutOfMemoryError -XX:HeapDumpPath="$atsd_home"/logs"Start ATSD
./atsd/atsd/bin/start-atsd.shWatch the
atsd.log.tail -F -n 100 ./atsd/atsd/logs/atsd.logIt can take ATSD several minutes to create tables after initializing the system.
...
2018-08-31 22:10:37,890;INFO;main;org.springframework.web.servlet.DispatcherServlet;FrameworkServlet 'dispatcher': initialization completed in 3271 ms
...
2019-03-11 12:10:37,927;INFO;main;org.eclipse.jetty.server.AbstractConnector;Started SelectChannelConnector@0.0.0.0:8088
2019-03-11 12:10:37,947;INFO;main;org.eclipse.jetty.util.ssl.SslContextFactory;Enabled Protocols [TLSv1, TLSv1.1, TLSv1.2] of [SSLv2Hello, SSLv3, TLSv1, TLSv1.1, TLSv1.2]
2019-03-11 12:10:37,950;INFO;main;org.eclipse.jetty.server.AbstractConnector;Started SslSelectChannelConnector@0.0.0.0:8443
Log in to ATSD web interface on the HTTPS port.
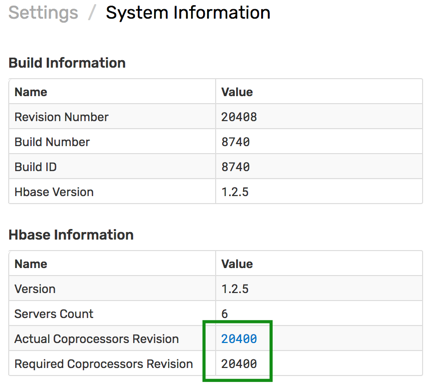
https://atsd_hostname_:8443Open the Settings > System Information page and verify that the co-processor file is compatible with the ATSD version.