ActiveMQ Integration
This document describes the process of configuring ActiveMQ for availability and performance monitoring with ATSD.
Requirements
- ActiveMQ
5.x.+
Configuring ActiveMQ Server
Step 1: Enable JMX and Log Aggregator
- Log in to the ActiveMQ server via SSH.
- Change to the ActiveMQ installation directory.
cd /opt/apache-activemq-5.13.1
- Download
.jarlog aggregation filter files to the ActiveMQlibdirectory:
wget --content-disposition -P ./lib/ \
   "https://repository.sonatype.org/service/local/artifact/maven/redirect?r=central-proxy&g=com.axibase&a=aggregation-log-filter&v=LATEST"
wget --content-disposition -P ./lib/ \
   "https://repository.sonatype.org/service/local/artifact/maven/redirect?r=central-proxy&g=com.axibase&a=aggregation-log-filter-log4j&v=LATEST"
- Append aggregation filter settings to the ActiveMQ
log4jproperties file. Replaceatsd_hostnamewith the hostname of the ATSD server:
cat <<EOF >> ./conf/log4j.properties
log4j.appender.logfile.filter.COLLECTOR=com.axibase.tsd.collector.log4j.Log4jCollector
log4j.appender.logfile.filter.COLLECTOR.writerHost=atsd_hostname
EOF
See Aggregation Log Filter for additional configuration options.
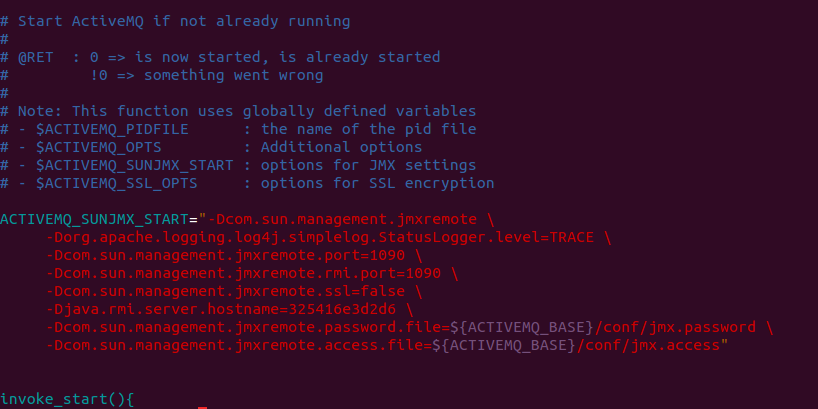
Modify JMX settings in the ActiveMQ JVM launch options.
Search for the
ACTIVEMQ_SUNJMX_STARTsetting and replaceactivemq_hostnamewith the full hostname or IP address of the ActiveMQ server. This is the same hostname that Axibase Collector uses when connecting to ActiveMQ server.
For more information on configuring JMX in ActiveMQ, see ActiveMQ JMX Notes
ActiveMQ 5.11.x and later:
vi ./bin/env
ACTIVEMQ_SUNJMX_START="$ACTIVEMQ_SUNJMX_START -Dcom.sun.management.jmxremote"
ACTIVEMQ_SUNJMX_START="$ACTIVEMQ_SUNJMX_START -Dcom.sun.management.jmxremote.port=1090"
ACTIVEMQ_SUNJMX_START="$ACTIVEMQ_SUNJMX_START -Dcom.sun.management.jmxremote.rmi.port=1090"
ACTIVEMQ_SUNJMX_START="$ACTIVEMQ_SUNJMX_START -Dcom.sun.management.jmxremote.ssl=false"
ACTIVEMQ_SUNJMX_START="$ACTIVEMQ_SUNJMX_START -Djava.rmi.server.hostname=activemq_hostname"
ACTIVEMQ_SUNJMX_START="$ACTIVEMQ_SUNJMX_START -Dcom.sun.management.jmxremote.password.file=${ACTIVEMQ_CONF}/jmx.password"
ACTIVEMQ_SUNJMX_START="$ACTIVEMQ_SUNJMX_START -Dcom.sun.management.jmxremote.access.file=${ACTIVEMQ_CONF}/jmx.access"
ActiveMQ 5.10.x and earlier:
vi ./bin/activemq
ACTIVEMQ_SUNJMX_START="-Dcom.sun.management.jmxremote \
   -Dcom.sun.management.jmxremote.port=1090 \
   -Dcom.sun.management.jmxremote.rmi.port=1090 \
   -Dcom.sun.management.jmxremote.ssl=false \
   -Djava.rmi.server.hostname=activemq_hostname \
   -Dcom.sun.management.jmxremote.password.file=${ACTIVEMQ_BASE}/conf/jmx.password \
   -Dcom.sun.management.jmxremote.access.file=${ACTIVEMQ_BASE}/conf/jmx.access"
Either result is the same as shown in the image below:
- Modify JMX security credential files in
./confdirectory.
jmx.access:
# The "monitorRole" role has readonly access.
monitorRole readonly
jmx.password:
# The "monitorRole" role password is "abc123".
monitorRole abc123
- Secure access to the
jmx.passwordfile by restricting permissions:
chmod 600 ./conf/jmx.password
- Restart ActiveMQ server.
./bin/activemq stop
./bin/activemq start
Step 2: View Collected Logs in ATSD
- Log in to the ATSD web interface at
https://atsd_hostname:8443. - Open the Entities tab.
- Locate the ActiveMQ host in the Entities list or enter the entity name in the Search Bar above the list.
- Click the Portal icon next to the host.
![]()
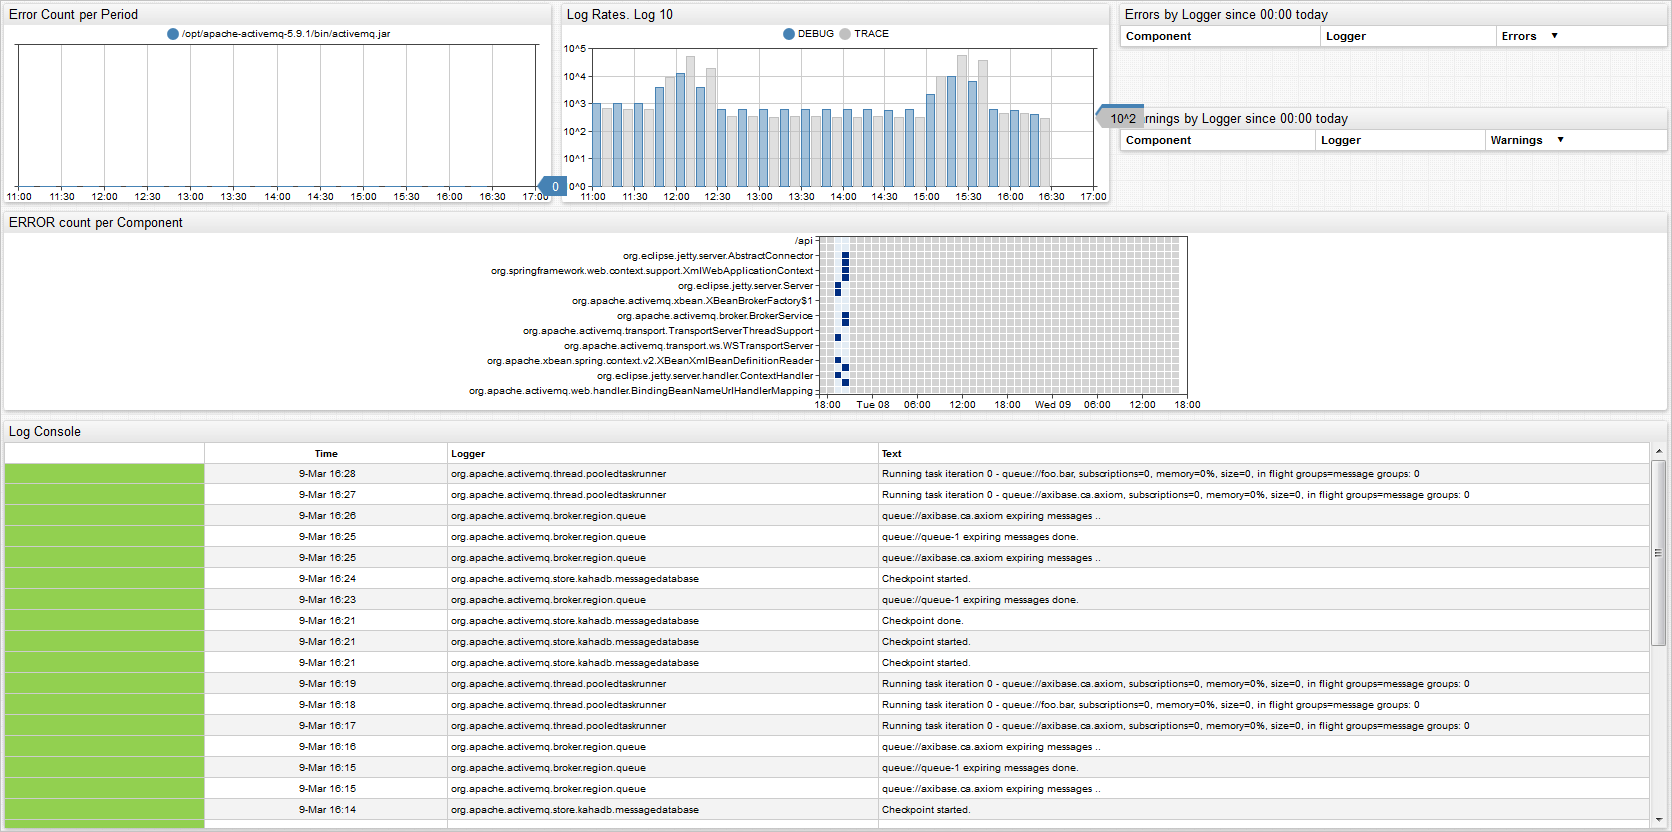
An example of the collected log data displayed in the ATSD portal is shown in the image below:
Configuring Statistics Collection
Before Beginning
Log in to Axibase Collector via SSH and verify that the ActiveMQ server is reachable on activemq_hostname (see Step 1).
If the activemq_hostname cannot be resolved, add it to /etc/hosts manually.
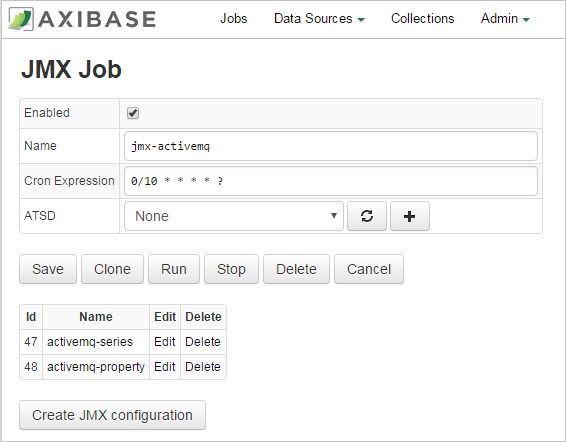
Step 3: Configure ActiveMQ JMX Job
- Log in to Axibase Collector at
https://collector_hostname:9443. - From the Jobs page, locate the
jmx-activemqjob. - On the JMX Job page, enable collection with the Enabled checkbox, click Save.
- Adjust the
cronexpression if needed. By default, Collector executes the job every ten seconds. For more information oncronexpressions, see Scheduling.
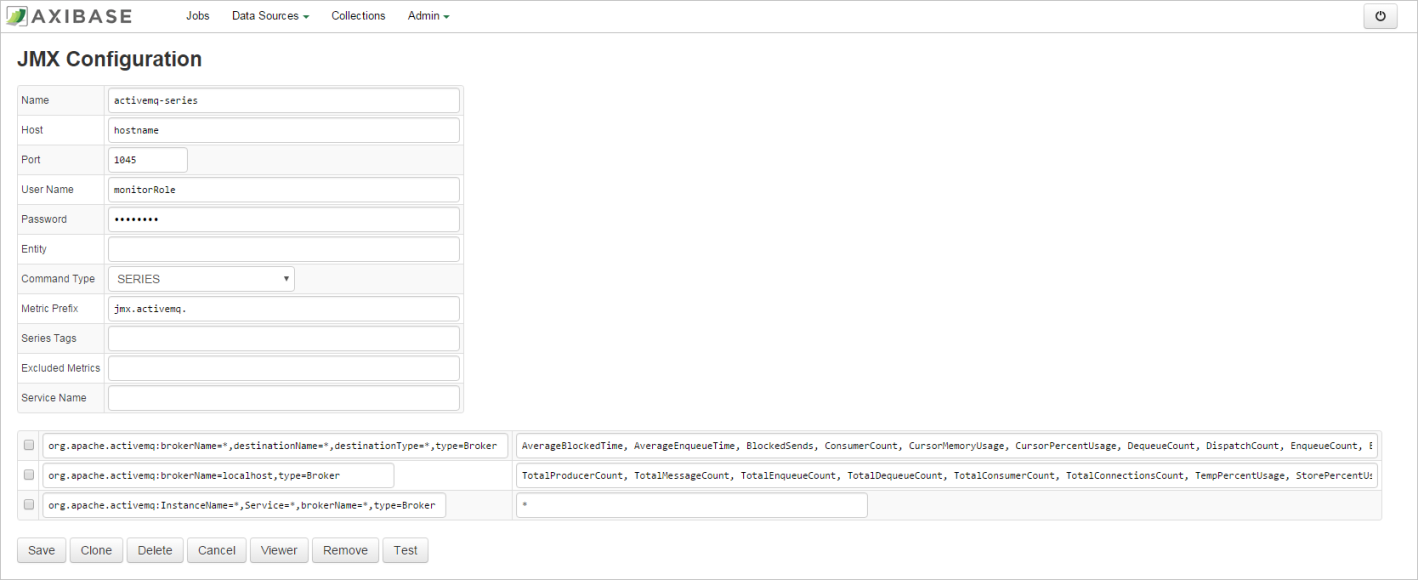
Configuring Series Collection
Select
activemq-seriesconfiguration.On the JMX Configuration page, enter the JMX connection parameters, specified in Step 1.6 above:
- Host: ActiveMQ hostname. Must be the same as the
activemq_hostname. - Port: JMX port.
- User Name: JMX user name such as
monitorRole. Read-only permissions are sufficient. - Password: Password for JMX user.
- Entity: Optionally, specify the output of the hostname command on the ActiveMQ server if the hostname differs from
activemq_hostname(for example, ifactivemq_hostnamerepresents a fully-qualified name). - Other parameters are optional. For more information on JMX configuration, see JMX.
- Host: ActiveMQ hostname. Must be the same as the
Click Test to validate the configuration. If the existing configuration passes, this indicates that there are no errors or empty fields in the test results.
Click Save.
Configuring Property Collection
- From the table on the JMX Job page, click Edit next to the
activemq-propertyconfiguration. - Set Host, Port, User Name, Password, and Entity fields as described in the previous section.
- Click Test to validate the configuration.
- Click Save.
Step 4: View ActiveMQ Statistics in ATSD
- Log in to ATSD web interface at
https://atsd_hostname:8443. - Open the Entities tab.
- Locate the ActiveMQ host in the Entities list or enter the name in Search Bar above the list.
- Click the Portal icon next to the host.
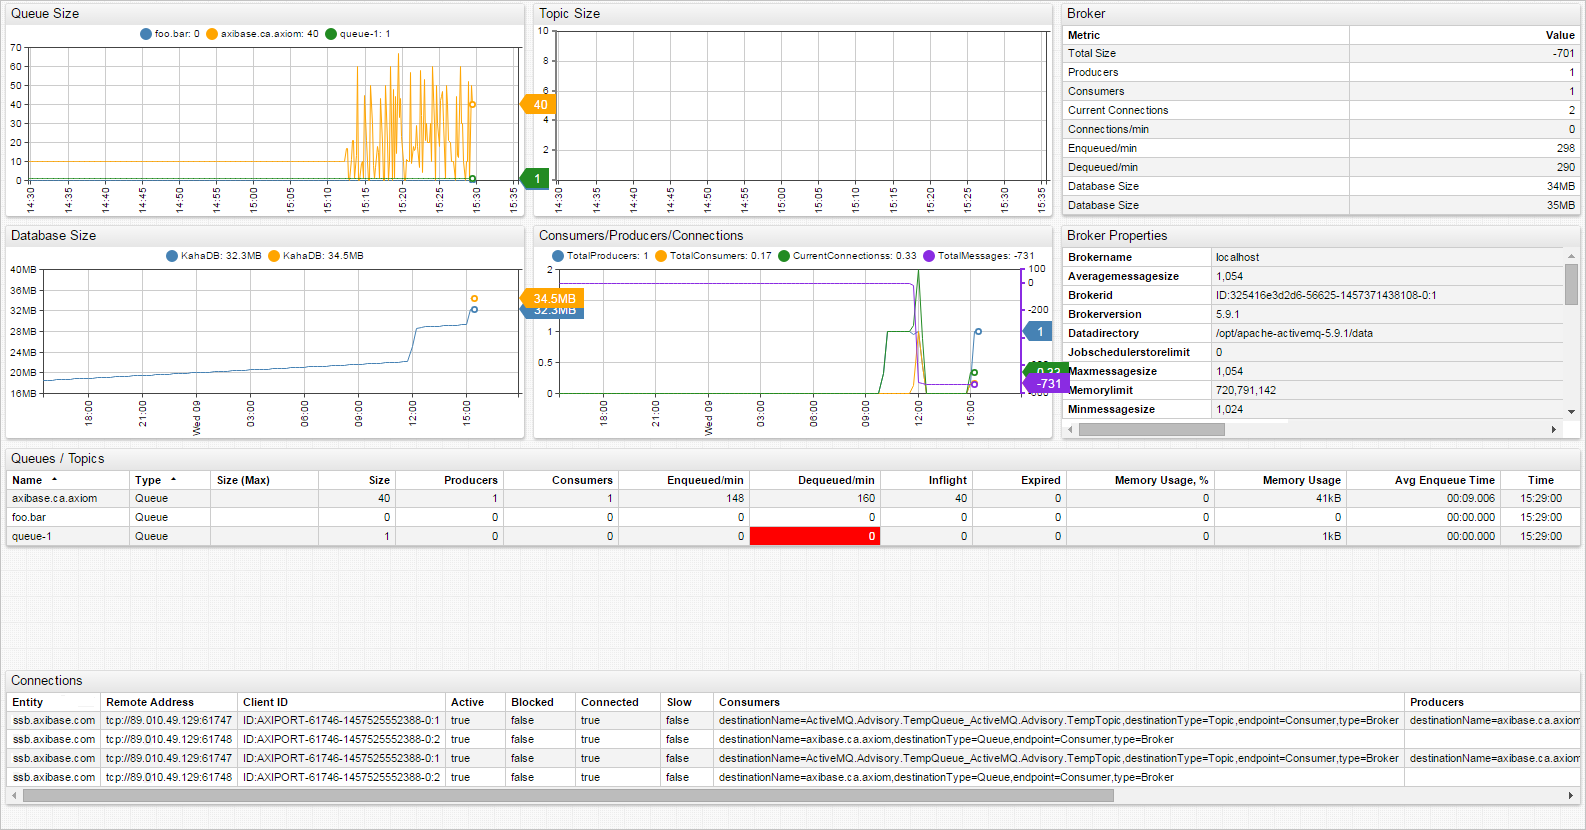
![]()
See example collected log data displayed in an ATSD portal in the image below: