Configuring Slack/Telegram Notifications for New GitHub Project Releases
Overview
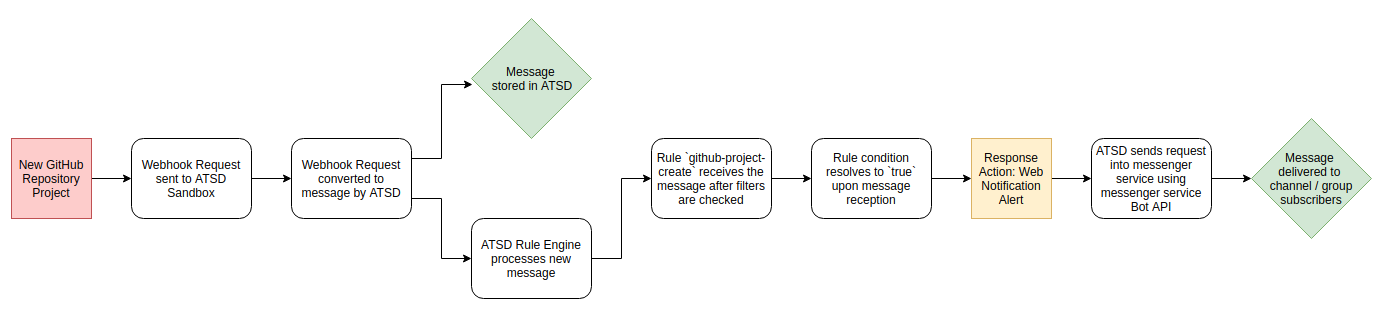
This guide shows how to configure GitHub to alert you when someone creates a new project in your repository. This feature allows you to monitor your repository and receive notifications the moment a project is created. Follow the instructions to configure ATSD to send you the notifications directly through a third-party messenger service.
Purpose
The GitHub Team has developed Project functionality to enable users to design, execute, and complete the projects associated with code stored on GitHub without the need for an external plug-in. Many GitHub repositories contain thousands of lines of code and handle a large number of projects, especially those associated with larger organizations with employees across the globe.
While the default email notifications delivered by GitHub provide a convenient way to stay on track, the flexibility of watching new projects from creation can be better accomplished by programmatic integration leveraging GitHub webhook functionality.
GitHub webhook functionality is prominently featured on the Platform Roadmap, explore the latest developments from the GitHub Team and gain an insight into coming features.
Launch ATSD Sandbox
Execute the docker run command to launch a local ATSD sandbox instance.
Replace the SERVER_URL parameter with the public DNS name of the Docker host where the sandbox container is running. The Docker host must be externally accessible to receive webhook notifications from GitHub servers.
To acquire the Bot User Token, open the Slack API, select the application to use for integration, and navigate to the Install App tab. The Bot User OAuth Access Token field contains the needed information. Note that you must be a collaborator for the application which you want to integrate.
docker run -d -p 8443:8443 \
  --name=atsd-sandbox \
  --env START_COLLECTOR=off \
  --env SERVER_URL=https://atsd.company_name.com:8443 \
  --env WEBHOOK=github \
  --env SLACK_TOKEN=xoxb-************-************************ \
  --env SLACK_CHANNELS=general \
  --env ATSD_IMPORT_PATH='https://raw.githubusercontent.com/axibase/atsd-use-cases/master/integrations/github/resources/github-project-create.xml' \
  axibase/atsd-sandbox:latest
For advanced launch settings refer to the ATSD Sandbox Documentation.
Watch the sandbox container logs for All applications started.
docker logs -f atsd-sandbox
Copy the newly-created GitHub webhook URL from the log output once all applications successfully start.
All applications started
Webhooks created:
Webhook user: github
Webhook URL: https://github:password@atsd.example.org:8443/api/v1/messages/webhook/github?exclude=organization.*;repository.*;*.signature;*.payload;*.sha;*.ref;*_at;*.id&include=repository.name;repository.full_name&header.tag.event=X-GitHub-Event&excludeValues=http*&debug=true
Refer to GitHub Developer Guide for additional information on outgoing webhooks.
Open the Settings menu of the GitHub repository to monitor.
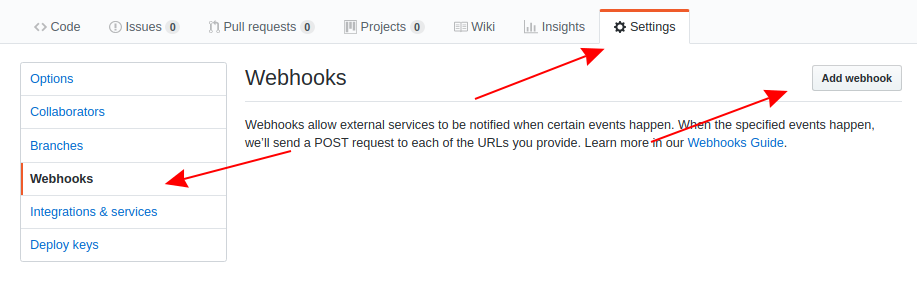
Open the Webhooks tab from the left-side menu and click Add Webhook.
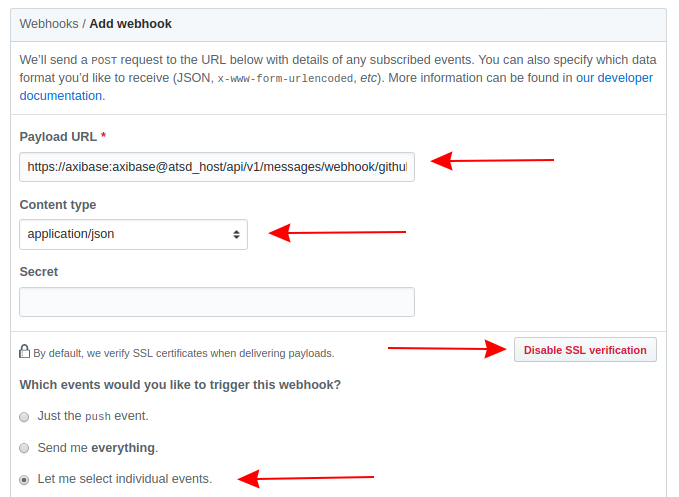
On the Add Webhook page, configure the following settings:
- Payload URL: Copy the GitHub webhook URL from the Docker log.
- Content Type: Select application/json.
- Click Disable SSL Verification and confirm the setting.
- Select Send me everything, under Which events would you like to trigger this webhook? The rule engine filters other events.
Be sure that your server is reachable by GitHub servers. For more information about configuring GitHub webhooks use the GitHub Developer Guide.
Once you configure your server and webhook, confirm connectivity at the bottom of the Manage Webhook page.
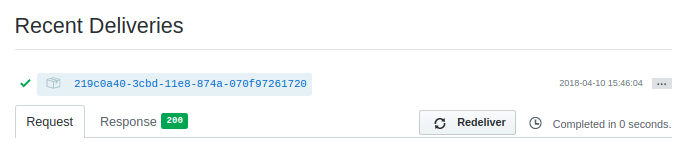
See Troubleshooting for connectivity issues.
You begin receiving messenger notifications the next time someone creates a project in your GitHub repository.
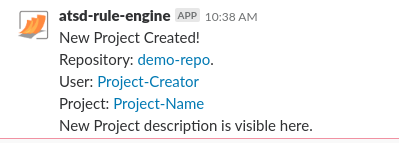
Repository, User, and Project links redirect you to the repository where the project exists, the user who created the project, and the project page itself, respectively.
Explore ATSD
Access the ATSD web interface at https://docker_host:8443/.
Log in to ATSD using the default credentials and explore the database.