Monitoring Event Sequences
Overview
Reacting to incoming messages in the ATSD rule engine is fairly straightforward. Specifying a filter and a response action is sufficient in most situations.

On the other hand, monitoring event sequences requires more advanced rule logic especially if some events fail to arrive within the expected time window.
Consider a case where the process consists of a sequence of tasks executed sequentially, and the monitoring system needs to raise an alert whenever the process stalls for any reason.
A basic example is a task that normally takes 3 minutes to complete. The instrumented task generates two events:
Task-01started.Task-01finished.
The objective is to raise an alert if the Task-01 finished event is not received within 5 minutes after the Task-01 started event.
The maximum delay of 5 minutes is calculated as the average (or maximum) task execution time of 3 minutes plus an additional 2 minute grace interval. Review historical data on the Messages tab to assist in the measurement of the expected time to completion.
Keywords
- Event sequences, heartbeat monitoring, automation, workflow, task monitoring
Objective
Create an alert if an event does not arrive on time.
Solution
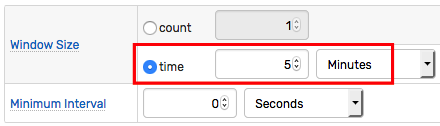
Create a time-based window to accumulate incoming events. Set window size to the maximum allowed task duration.
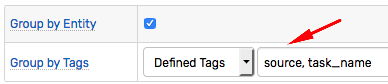
Group incoming events by entity and by task name. Enumerate grouping tags to ensure events for the same task are accumulated in the same window. If there is no task name, choose No Tags.
Enable the Check on Exit setting to evaluate the condition when the expired events are removed from the window.

Define a condition to return
truefor the last exiting event. The boolean expression must combine two checks: a) the window is empty, and b) the last event was intermediate, and not a normal task completion.count() == 0 && tags.stage != 'finished'Define a response action such as an email alert if the condition returns
true.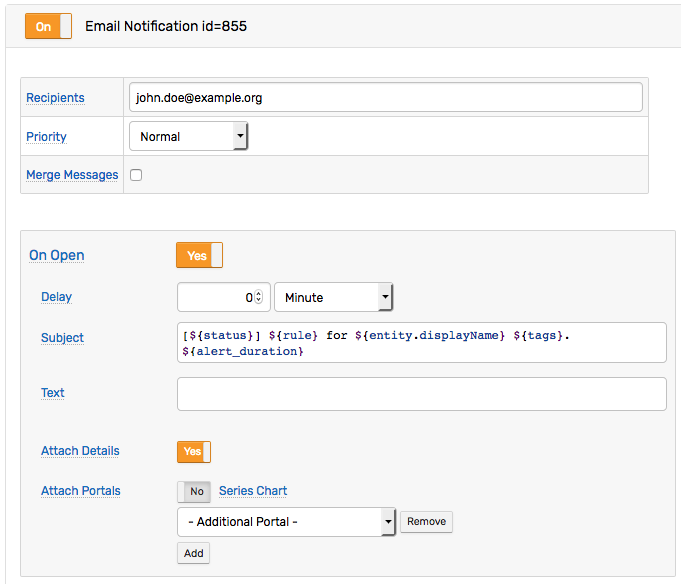
Test Rule
Prepare Rule
Create a new rule as described above.
Alternatively, import the sample rule used for this tutorial. Set the correct email address on the Email action tab. Refer to Email Action for more details.
Failed Task Test
Open the Data > Data Entry page and submit the following message command to "start" the task.
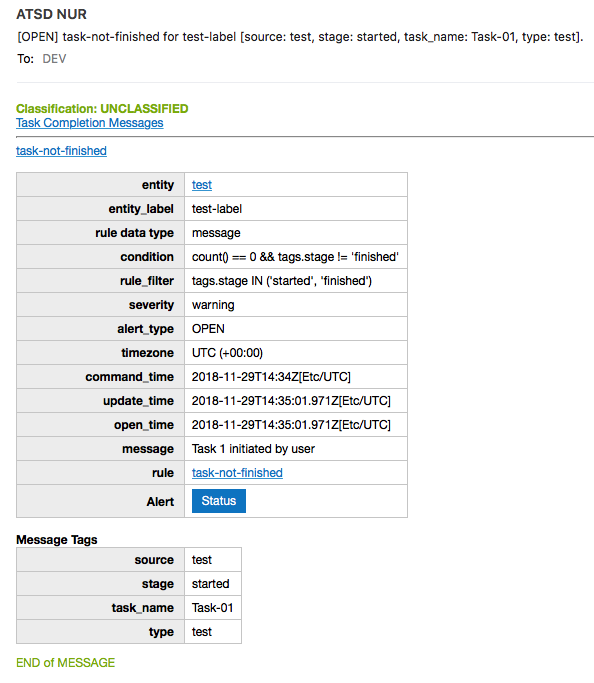
message t:task_name=Task-01 t:stage=started m:"Task 1 initiated by user" e:test t:type=test t:source=test
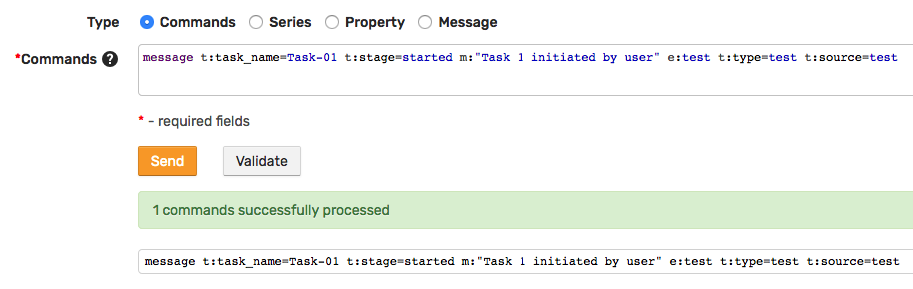
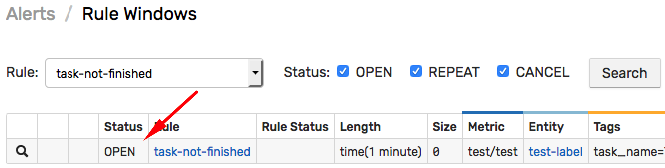
Wait for maximum delay (1 minute) and confirm on the Alerts > Open Alerts page that an alert is raised for this rule. The alert is raised because the last expiring message is a message with the stage tag set to started (and not to finished).
A corresponding alert email is sent with detailed alert information.
Normal Task Test
Open the Data > Data Entry page and submit the following message command.
message t:task_name=Task-01 t:stage=started m:"Task 1 initiated by user" e:test t:type=test t:source=test
Wait for several seconds (less than 1 minute) and submit the command below to "finish" the task in due time.
message t:task_name=Task-01 t:stage=finished m:"Task 1 completed successfully" e:test t:type=test t:source=test
Wait for maximum delay (1 minute) and confirm on the Alerts > Open Alerts page that no alert is raised for this rule. The alert is not raised since the last expiring message is a message with stage tag set to finished.