Getting Started: Inserting Data
Contents
- Introduction
- Inserting Data
- Portals
- Exporting Data
- SQL
- Alerting
Network Commands
In the previous section you inserted data manually using the web interface. Proceed by inserting data in network command format.
Network commands provide a compact syntax to insert both time series data as well as metadata.
command_name field_prefix:[field_name=]field_value
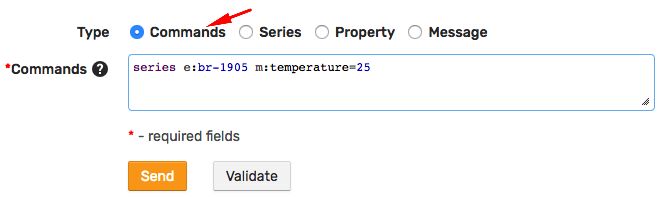
Open the console and send these commands into ATSD.
echo -e "series e:br-1905 m:temperature=25" \
  | nc -q 0 atsd_hostname 8081
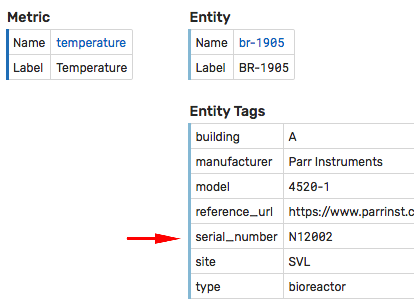
echo -e "entity e:br-1905 t:serial_number=N12002" \
  | nc -q 0 atsd_hostname 8081
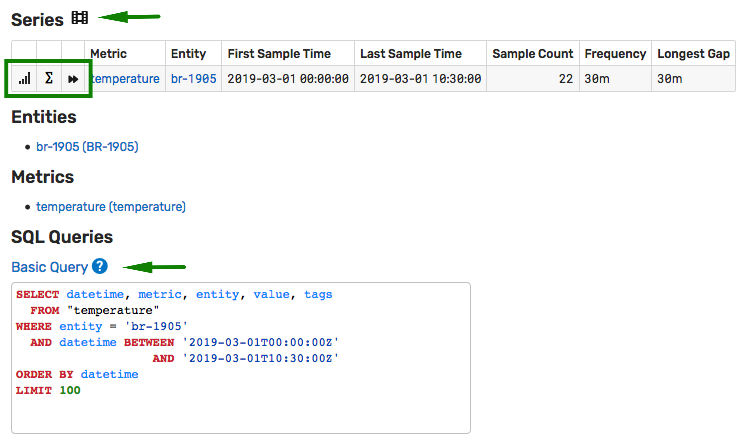
Refresh the Series Statistics page and Entity Editor to verify that the temperature sample is received and the entity tag series_number is set.
You can also insert the same network commands on the Data > Data Entry page for convenience.
REST API
While the network commands are optimized for writing data, the REST API provides endpoints to both write and read data by sending HTTP requests in JSON format.
Sending Values at a Specific Time
Open the console and send a single observation with a specific datetime into the Series: Insert endpoint. Replace <username> with your username.
curl https://atsd_hostname:8443/api/v1/series/insert \
  --insecure -w "%{http_code}\n" \
  --user <username> \
  --header "Content-Type: application/json" \
  --data '[{"entity": "br-1905", "metric": "temperature", "data": [{ "d": "2019-03-01T14:00:00Z", "v": 17.0 }]}]'
The payload transmitted to the database is a JSON document containing the series key and an array of datetime:value samples. The array data can contain any number of samples.
[{
  "entity": "br-1905",
  "metric": "temperature",
  "data": [
    { "d": "2019-03-01T14:00:00Z", "v": 17.0 },
    { "d": "2019-03-01T14:05:00Z", "v": 17.5 }
  ]
}]
Sending Values at the Current Time
Send a modified version, where the datetime is set to present time using the date -u +"%Y-%m-%dT%H:%M:%SZ" command.
curl https://atsd_hostname:8443/api/v1/series/insert \
  --insecure -w "%{http_code}\n" \
  --user <USER> \
  --header "Content-Type: application/json" \
  --data '[{"entity": "br-1905", "metric": "temperature", "data": [{ "d": "'$(date -u +"%Y-%m-%dT%H:%M:%SZ")'", "v": 19.0 }]}]'
Reload the Series Statistics page and observe new values.
Sending Values Continuously
Replace <username>:<password> with user credentials in the curl command provided below to send random values between 20 and 40 into the database every five seconds.
for i in {1..100}; do \
RANDOM_TEMPERATURE=$((20 + RANDOM % 20)); echo "send ${RANDOM_TEMPERATURE}"; \
curl https://atsd_hostname:8443/api/v1/series/insert \
  --insecure -w "%{http_code}\n" \
  --user <username>:<password> \
  --header "Content-Type: application/json" \
  --data '[{"entity": "br-1905", "metric": "temperature", "data": [{ "d": "'$(date -u +"%Y-%m-%dT%H:%M:%SZ")'", "v": '"$RANDOM_TEMPERATURE"' }]}]'; \
sleep 0.5; \
done
Refer to API Documentation and examples for more information.
CSV Files
CSV is one of the most commonly used tabular formats. Despite widespread use, the format remains non-standardized. ATSD provides a flexible CSV Parser that converts CSV files of any composition into structured database records.
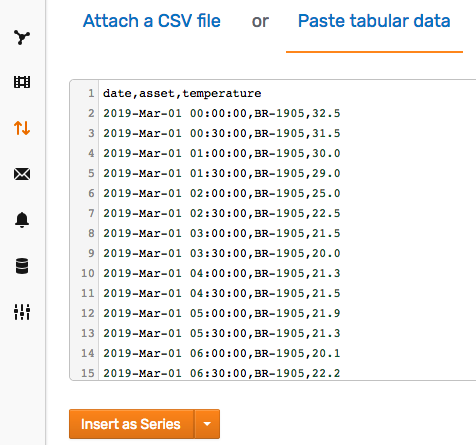
Create a CSV file temperature.csv.
date,asset,temperature
2019-Mar-01 00:00:00,BR-1905,32.5
2019-Mar-01 00:30:00,BR-1905,31.5
2019-Mar-01 01:00:00,BR-1905,30.0
2019-Mar-01 01:30:00,BR-1905,29.0
2019-Mar-01 02:00:00,BR-1905,25.0
2019-Mar-01 02:30:00,BR-1905,22.5
2019-Mar-01 03:00:00,BR-1905,21.5
2019-Mar-01 03:30:00,BR-1905,20.0
2019-Mar-01 04:00:00,BR-1905,21.3
2019-Mar-01 04:30:00,BR-1905,21.5
2019-Mar-01 05:00:00,BR-1905,21.9
2019-Mar-01 05:30:00,BR-1905,21.3
2019-Mar-01 06:00:00,BR-1905,20.1
2019-Mar-01 06:30:00,BR-1905,22.2
2019-Mar-01 07:00:00,BR-1905,22.5
2019-Mar-01 07:30:00,BR-1905,22.7
2019-Mar-01 08:00:00,BR-1905,22.1
2019-Mar-01 08:30:00,BR-1905,21.2
2019-Mar-01 09:00:00,BR-1905,20.5
2019-Mar-01 09:30:00,BR-1905,20.7
2019-Mar-01 10:00:00,BR-1905,20.9
2019-Mar-01 10:30:00,BR-1905,21.5
Open Data > CSV Parser Wizard and attach the file. Alternatively, copy the file contents into the 'Paste tabular data' area.
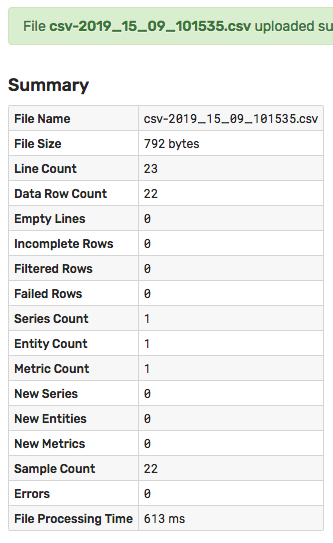
Proceed through the Add File > Parse > Model > Upload steps and click Upload File to store the records in the database.

Review summary information about the uploaded records.
Explore default charts, forecasts and sample SQL queries prepared for the imported series.
Continue to Part 3: Portals.