Telegram Outgoing Webhook
Overview
The document describes how to relay messages addressed to a Telegram Bot into ATSD for subsequent processing. Typical use cases include replying to information requests and executing predefined actions.
The integration relies on the Telegram Bot API setWebhook method to send messages and the ATSD webhook endpoint to receive HTTP requests from Telegram servers and to convert them into message commands that are stored and processed by the rule engine.
Reference
Create Telegram Bot
A bot is a special user account created for automation and integration purposes.
Search for the
BotFatheruser in Telegram client.Start a conversation with the BotFather user.
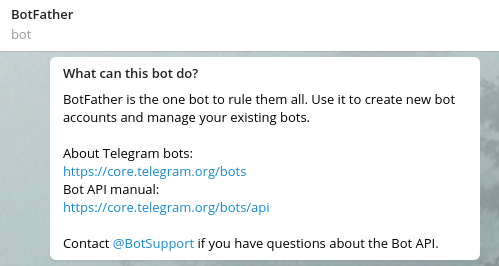
Send the
/newbotcommand and complete the guided process to create a bot user and obtain its token. The bot username must end with_botand cannot contain dash-symbol.
Use this token to access the HTTP API:
5555555555:AAHrB1gmYKaSvzsXjhbyDypOJlfu_FgdwrE
- Copy the API token for future reference.
Prepare Webhook URL
Prepare a request URL for accepting notifications from Telegram servers.
Open the Settings > Users > Create Webhook User page in ATSD and create a webhook user for accepting requests from Telegram servers.
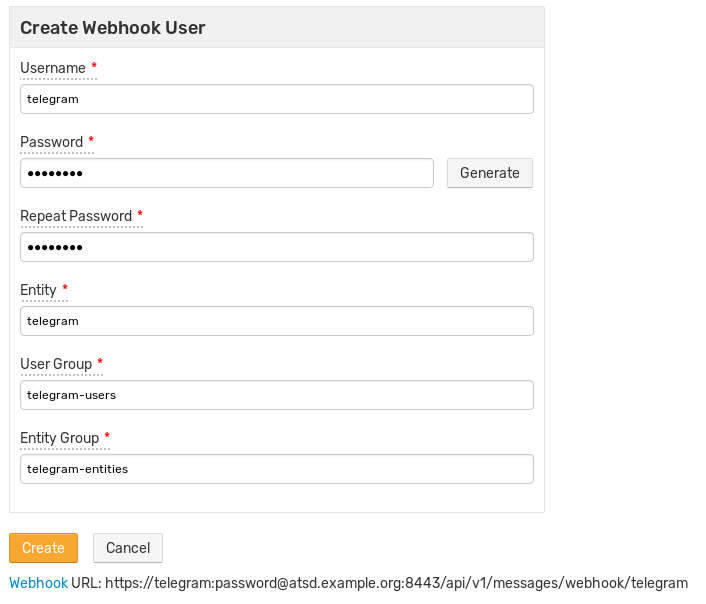
Replace user credentials and the DNS name of the target ATSD instance in the webhook URL below.
https://username:password@atsd_hostname:8443/api/v1/messages/webhook/telegram?command.message=message.text
The target ATSD server must be accessible on one of the supported ports: 80, 88, 443, 8443.
Set Webhook
Setup a webhook based on the SSL certificate installed in ATSD:
- CA-signed SSL certificates are trusted by Telegram servers by default and no further configuration is required.
- In case of self-signed certificates, establish trust by uploading certificates to Telegram servers.
CA-signed SSL certificate
Set webhook by specifying the webhook URL.
Update url= with webhook user credentials created in the previous step.
curl -F "url=https://username:password@atsd_hostname:8443/api/v1/messages/webhook/telegram?command.message=message.text" \
    https://api.telegram.org/botBOT_TOKEN/setWebhook
Self-signed SSL certificate
Export the self-signed SSL certificate in PEM format:
keytool -importkeystore -srckeystore /opt/atsd/atsd/conf/server.keystore -destkeystore /opt/atsd/atsd/conf/server.keystore.p12 -srcstoretype jks -deststoretype pkcs12
openssl pkcs12 -in /opt/atsd/atsd/conf/server.keystore.p12 -out /opt/atsd/atsd/conf/server.keystore.pem -nokeys
Set webhook by specifying the webhook URL and attaching theserver.keystore.pem file.
Update url= with webhook user credentials created in the previous step.
curl -F "url=https://username:password@atsd_hostname:8443/api/v1/messages/webhook/telegram?command.message=message.text" \
    -F "certificate=@/opt/atsd/atsd/conf/server.keystore.pem" \
    https://api.telegram.org/botBOT_TOKEN/setWebhook
Check Webhook
Ensure that the getWebhookInfo method does not return any SSL errors:
curl "https://api.telegram.org/botBOT_TOKEN/getWebhookInfo"
{
  "ok": true,
  "result": {
    "url": "https://username:password@atsd_hostname:8443/api/v1/messages/webhook/telegram?command.message=message.text",
    "has_custom_certificate": true,
    "pending_update_count": 0,
    "max_connections": 40
  }
}
Test Integration
Create or Import Rule
- Create a new rule as described below or import an existing rule.
- Download the file
rules_outgoing_webhook.xml. - Open the Alerts > Rules > Import page.
- Check Auto-enable New Rules, attach the
rules_outgoing_webhook.xmlfile, click Import.
Configure Webhook
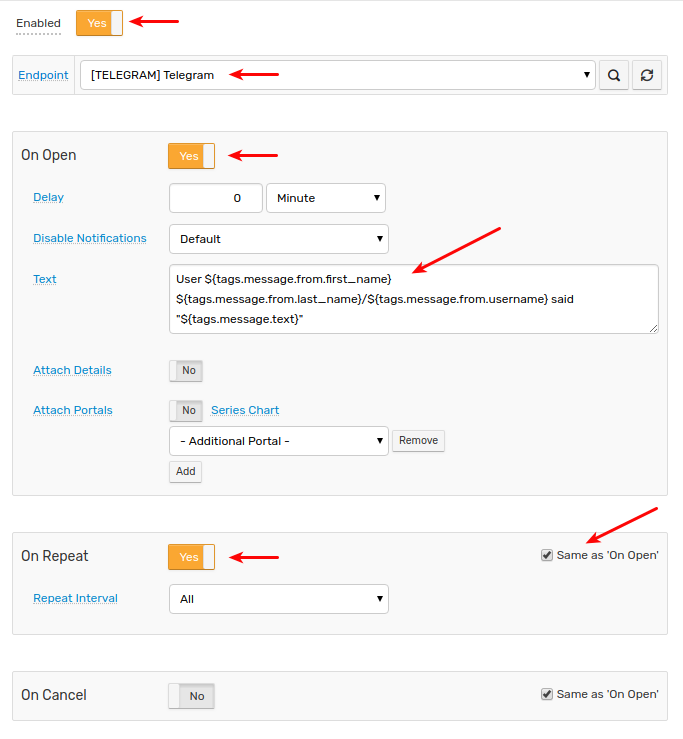
- Open the Alerts > Rules page and select the new or imported rule.
- Open the Webhooks tab.
- Select the webhook from the Endpoint drop-down list.
- Enable the
OPEN,REPEATtriggers. - Customize the alert message using placeholders if needed, for example:
User ${tags.message.from.first_name} ${tags.message.from.last_name}/${tags.message.from.username} said "${message}"
Click Save.
Verify Webhook Delivery
Open the Telegram client and send a direct message to the newly created bot.

Open the Alerts > Incoming Webhooks page and check that a request from Telegram servers has been received.

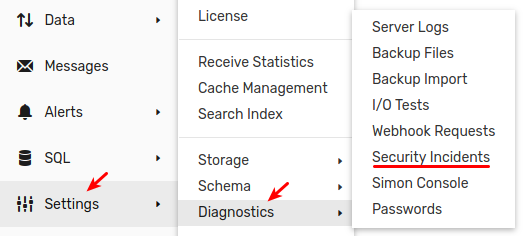
If the request is not visible, check the Settings > Diagnostics > Security Incidents page which displays an error in case the user credentials are mis-configured.

It can take a few seconds for the commands to arrive and trigger the notifications. The rule creates new windows based on incoming
messagecommands. Refresh the Alerts > Open Alerts page to verify that an alert is open for your rule.