
Docker Job
Overview
The Docker Job collects container statistics, states, and events from Docker daemons via the Docker Engine Remote API.
Information is collected for the following object types:
- Host
- Image
- Container
- Volume
- Network
Job Settings
| Name | Description |
|---|---|
API Version | API version used when querying the Docker Engine API. Defaults to latest. Can be set to a specific version to ensure compatibility. |
Lifecycle Event Monitoring | Enables continuous monitoring of container lifecycle events instead of scheduled polling. |
Property Interval, minutes | Interval for refreshing detailed image and container properties. |
Container Size Interval, seconds | Interval at which disk sizes of the running containers are collected. |
Statistics Interval, seconds | Interval at which utilization statistics from running containers are collected. |
Process Interval, minutes | Interval at which top process list is collected from running docker containers. |
Excluded Processes | Lists processes, separated by comma, to exclude from collection. Expressions support the wildcard option (*). |
Environment Tags | List of ENV variables stored as entity tags. |
Prerequisites
- Docker Engine v1.7+
- Axibase Time Series Database container as a centralized metrics store and rule engine.
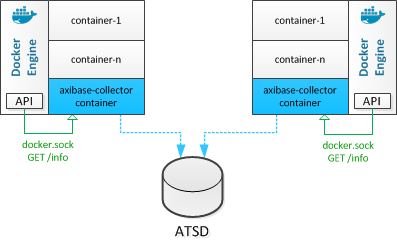
Local Installation
In local collection mode, Axibase Collector containers run on each Docker host and gather statistics locally from the Docker engine API exposed at the /var/run/docker.sock Unix socket.
- Create a collector account in ATSD.
- Replace
atsd_hostnamewith the ATSD hostname/IP address. The default HTTPS port is 8443. - Replace
usernameandpasswordwith valid credentials in the script below. - Start Axibase Collector container:
docker run \
   --detach \
   --publish 9443:9443 \
   --restart=always \
   --name=axibase-collector \
   --volume /var/run/docker.sock:/var/run/docker.sock \
   --env=DOCKER_HOSTNAME=`hostname -f` \
  axibase/collector \
   -atsd-url=https://username:password@atsd_hostname:8443 \
   -job-enable=docker-socket
If the username or password contains $, &, #, or ! character, escape the character with backslash \.
The password must contain at least six (6) characters and is subject to the following requirements.
For example, for user john.doe with password secret sending data to ATSD at https://192.0.2.1:8443 specify:
docker run \
   --detach \
   --publish 9443:9443 \
   --restart=always \
   --name=axibase-collector \
   --volume /var/run/docker.sock:/var/run/docker.sock \
   --env=DOCKER_HOSTNAME=`hostname -f` \
  axibase/collector \
   -atsd-url=https://john.doe:secret@192.0.2.1:8443 \
   -job-enable=docker-socket
Collector database initialization can take up to five minutes upon initial startup.
The Docker job begins to execute immediately.
Custom Job Settings
To launch a Docker job with customized settings, download the docker-socket-nosize.xml, modify the settings as required (for example, set containerSizeInterval to 0).
<com.axibase.collector.model.job.docker.DockerConfiguration>
  <!-- do not change other DockerConfiguration settings -->
  <propertyRefreshInterval>180</propertyRefreshInterval>
  <statisticsInterval>15</statisticsInterval>
  <processCollectionInterval>0</processCollectionInterval>
  <checkConfiguration>60</checkConfiguration>
  <retainDeletedContainers>7</retainDeletedContainers>
  <retainDeletedEntities>true</retainDeletedEntities>
  <containerSizeInterval>0</containerSizeInterval>
</com.axibase.collector.model.job.docker.DockerConfiguration>
Copy the file to /host/path/to/configs directory on the Docker host.
Modify directory path and job name in the below command to launch the container.
The job name in the job-enable parameter must match the name specified in the XML file, for example <name>docker-socket-nosize</name>.
docker run \
   --detach \
   --publish 9443:9443 \
   --restart=always \
   --name=axibase-collector \
   --volume /host/path/to/configs:/tmp \
   --volume /var/run/docker.sock:/var/run/docker.sock \
   --env=DOCKER_HOSTNAME=`hostname -f` \
  axibase/collector \
   -atsd-url=https://john.doe:secret@192.0.2.1:8443 \
   -job-path=/tmp/docker-socket-nosize.xml \
   -job-enable=docker-socket-nosize
SELinux
On Docker hosts with SELinux enabled in enforced mode, the container runs into a permission denied error when trying to read data from /var/run/docker.sock.
Switch to the Remote Collection option or follow one of these steps:
Run container in privileged mode (
--privileged)Run container with disabled security labeling (
--security-opt label=disable)Disable or set SELinux to logging mode with
sudo setenforce PermissiveOther alternatives using
semoduleLaunch Parameters
| Name | Required | Description |
|---|---|---|
--detach | Yes | Run container in background and print container id. |
--name | No | Assign a host-unique name to the container. |
--restart | No | Auto-restart policy. Not supported in all Docker Engine versions. |
--publish-all | No | Publish all exposed ports to random ports. |
--env | No | Set environment variables. |
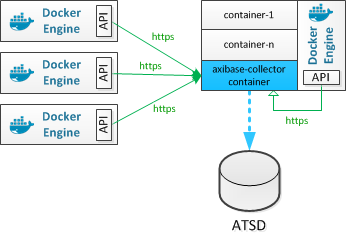
Remote Collection
In remote collection mode Axibase Collector fetches data from multiple remote Docker hosts using HTTPS protocol.
Enable Remote API Access on Docker Hosts
Log in to the Docker host via SSH and generate client and server certificates.
Configure the Docker daemon for secure access over HTTPS.
On Ubuntu 14.04
Edit the
/etc/default/dockerfile# Set path to the folder containing {ca,server-cert,server-key}.pem files DOCKER_CERT_PATH=/home/user/certs export DOCKER_CERT_PATH # Add TCP socket on port 2376 DOCKER_OPTS="--tlsverify --tlscacert=$DOCKER_CERT_PATH/ca.pem --tlscert=$DOCKER_CERT_PATH/server-cert.pem --tlskey=$DOCKER_CERT_PATH/server-key.pem -H unix:///var/run/docker.sock -H tcp://0.0.0.0:2376"Restart the Docker daemon.
sudo service docker restart
On Ubuntu 16.04, Centos 7.x and RHEL 7.x
Create new socket unit.
echo <<EOF > /lib/sytemd/system/docker-tcp.socket
[Unit]
Description=Docker TCP Socket for the API

[Socket]
ListenStream=2376
Service=docker.service

[Install]
WantedBy=sockets.target
EOF
Edit
/etc/docker/daemon.jsonfile by adding the options below. Replace/home/user/certswith absolute path of previously createdcertsdirectory.{ ..., "tlscacert": "/home/user/certs/ca.pem", "tlscert": "/home/user/certs/server-cert.pem", "tlskey": "/home/user/certs/server-key.pem", "tlsverify": true }Stop the Docker daemon and activate the socket.
systemctl enable docker-tcp.socket
systemctl stop docker
systemctl start docker-tcp.socket
Check that the socket has been successfully activated.
systemctl status docker-tcp.socketOutput example:
● docker-tcp.socket - Docker TCP Socket for the API
  Loaded: loaded (/lib/systemd/system/docker-tcp.socket; enabled; vendor preset: enabled)
  Active: active (running) since Sat 2018-03-03 18:54:32 CET; 2min ago
  Listen: [::]:2376 (Stream)

Mar 03 18:54:32 localhost systemd[1]: Listening on Docker TCP Socket for the API.
Start the Docker daemon.
systemctl start dockerEnsure that the Docker daemon status is active and there are no warnings.
systemctl status docker
Verify connectivity by connecting to the Docker host on its hostname or IP address, for example
198.51.100.1.curl https://198.51.100.1:2376/info \ --cert /home/user/certs/cert.pem \ --key /home/user/certs/key.pem \ --cacert /home/user/certs/ca.pemCopy the
{ca,cert,key}.pemfiles to your machine.
Launch Axibase Collector Container
Create a collector account in ATSD.
Start Axibase Collector container, replacing
usernameandpasswordwith valid credentials:
docker run \
   --detach \
   --publish 9443:9443 \
   --name=axibase-collector \
  axibase/collector \
   -atsd-url=https://username:password@atsd_hostname:8443
If the username or password contains a $, &, #, or ! character, escape the character with backslash \.
The password must contain at least 6 characters and is subject to the following requirements.
- Find the HTTPS port assigned to the
axibase-collectorcontainer.
docker ps -a | grep axibase-collector
- Log in to the Axibase Collector web interface at
https://hostname:port. - Open the Jobs > Docker page and click Add Job. Enter the job name. Click Enabled to enable the job. Click Save.
- Click Use Wizard, specify the Docker Engine hostname, API port (
2376), and attach{cert,key,ca}.pemfiles. - Click Validate and then Save if the test is successful.
Validation
Log in to ATSD and verify that connected Docker hosts are displayed on the Entities > Docker Hosts page.
If the Docker host is missing in ATSD, open the Jobs page in Collector, check the Result column, and review the Execution Details page for any errors.
Container Launch Troubleshooting
docker exec -it axibase-collector tail -f /opt/axibase-collector/logs/axibase-collector.log
The following message indicates that the initial configuration is finished:
FrameworkServlet 'dispatcher': initialization completed.
UI
Verify the HTTPS port that is assigned to Collector and open the application in your browser: https://container-ip:port
docker ps | grep axibase-collector
Locate the docker-socket job on the Jobs page and verify that the job is enabled and that the Items Read column is not 0.
Testing and Evaluating
Optionally launch either the atsd and axibase-collector containers in a test environment using docker-compose.