
Monitoring ActiveMQ with ATSD
Overview
This document describes the process of configuring ActiveMQ for availability and performance monitoring with ATSD.
Requirements
Installation Steps
Configure ActiveMQ Server
Enable JMX and Log Aggregator
- Log in to the ActiveMQ server via SSH.
- Change to the ActiveMQ installation directory.
cd /opt/apache-activemq-5.13.1
- Download the log aggregation filter
.jarfiles to the ActiveMQ lib directory:
wget --content-disposition -P ./lib/ \
   "https://repository.sonatype.org/service/local/artifact/maven/redirect?r=central-proxy&g=com.axibase&a=aggregation-log-filter&v=LATEST"
wget --content-disposition -P ./lib/ \
   "https://repository.sonatype.org/service/local/artifact/maven/redirect?r=central-proxy&g=com.axibase&a=aggregation-log-filter-log4j&v=LATEST"
- Append aggregation filter settings to the ActiveMQ
log4j.propertiesfile. Replaceatsd_hostnamewith the hostname of the ATSD server:
cat <<EOF >> ./conf/log4j.properties
log4j.appender.logfile.filter.COLLECTOR=com.axibase.tsd.collector.log4j.Log4jCollector
log4j.appender.logfile.filter.COLLECTOR.writerHost=atsd_hostname
EOF
See Aggregation Log Filter for additional configuration options.
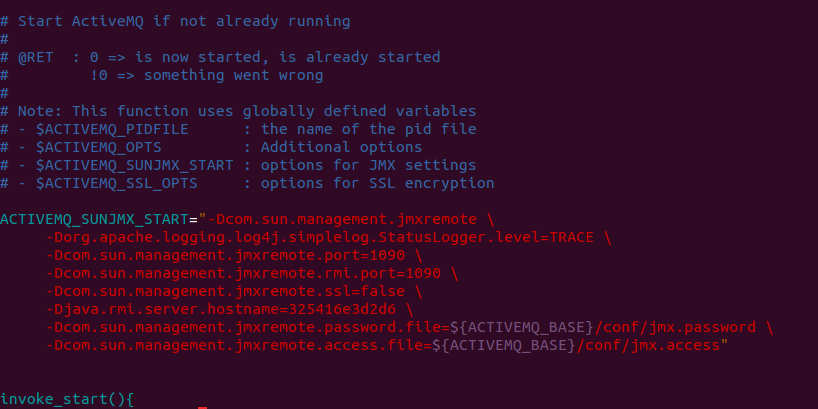
- Modify JMX settings in ActiveMQ JVM launch options.
- Search for the
ACTIVEMQ_SUNJMX_STARTsetting and modify the setting as specified below. - Replace
activemq_hostnamewith the full hostname or the IP address of the ActiveMQ server. - This must be the same hostname that Axibase Collector uses when connecting to the ActiveMQ server.
- For more information on configuring JMX in ActiveMQ, see Apache ActiveMQ Documentation
- Search for the
ActiveMQ 5.11.x and later:
vi ./bin/env
ACTIVEMQ_SUNJMX_START="$ACTIVEMQ_SUNJMX_START -Dcom.sun.management.jmxremote"
ACTIVEMQ_SUNJMX_START="$ACTIVEMQ_SUNJMX_START -Dcom.sun.management.jmxremote.port=1090"
ACTIVEMQ_SUNJMX_START="$ACTIVEMQ_SUNJMX_START -Dcom.sun.management.jmxremote.rmi.port=1090"
ACTIVEMQ_SUNJMX_START="$ACTIVEMQ_SUNJMX_START -Dcom.sun.management.jmxremote.ssl=false"
ACTIVEMQ_SUNJMX_START="$ACTIVEMQ_SUNJMX_START -Djava.rmi.server.hostname=activemq_hostname"
ACTIVEMQ_SUNJMX_START="$ACTIVEMQ_SUNJMX_START -Dcom.sun.management.jmxremote.password.file=${ACTIVEMQ_CONF}/jmx.password"
ACTIVEMQ_SUNJMX_START="$ACTIVEMQ_SUNJMX_START -Dcom.sun.management.jmxremote.access.file=${ACTIVEMQ_CONF}/jmx.access"
ActiveMQ 5.10.x and earlier:
vi ./bin/activemq
ACTIVEMQ_SUNJMX_START="-Dcom.sun.management.jmxremote \
   -Dcom.sun.management.jmxremote.port=1090 \
   -Dcom.sun.management.jmxremote.rmi.port=1090 \
   -Dcom.sun.management.jmxremote.ssl=false \
   -Djava.rmi.server.hostname=activemq_hostname \
   -Dcom.sun.management.jmxremote.password.file=${ACTIVEMQ_BASE}/conf/jmx.password \
   -Dcom.sun.management.jmxremote.access.file=${ACTIVEMQ_BASE}/conf/jmx.access"
The expected result is:
- Modify JMX security credential files in the
./confdirectory.
jmx.access:
# The "monitorRole" role has readonly access.
monitorRole readonly
jmx.password:
# The "monitorRole" role has password "abc123".
monitorRole abc123
- Secure access to the
jmx.passwordfile by restricting permissions:
chmod 600 ./conf/jmx.password
- Restart ActiveMQ server.
./bin/activemq stop
./bin/activemq start
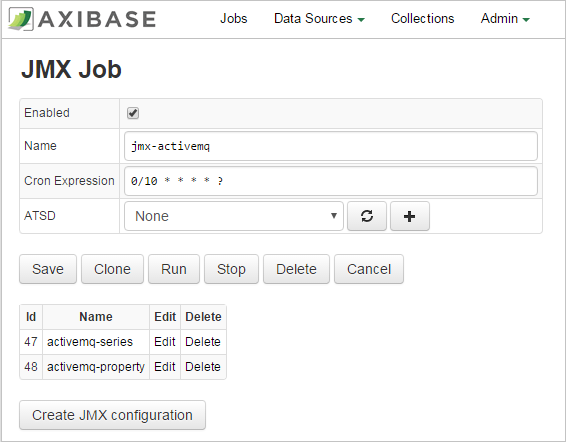
Configure ActiveMQ JMX Job
- Log in to Axibase Collector at
https://collector_hostname:9443. - Click the Jobs tab in the top menu.
- Locate the
jmx-activemqjob. - On the JMX Job page, enable job status by checking the box and selecting Enabled from the split-button at the bottom of the screen.
- Adjust the
cronexpression if required. By default, the job is executed every 10 seconds.
For more information on
cronexpressions, see Scheduling.
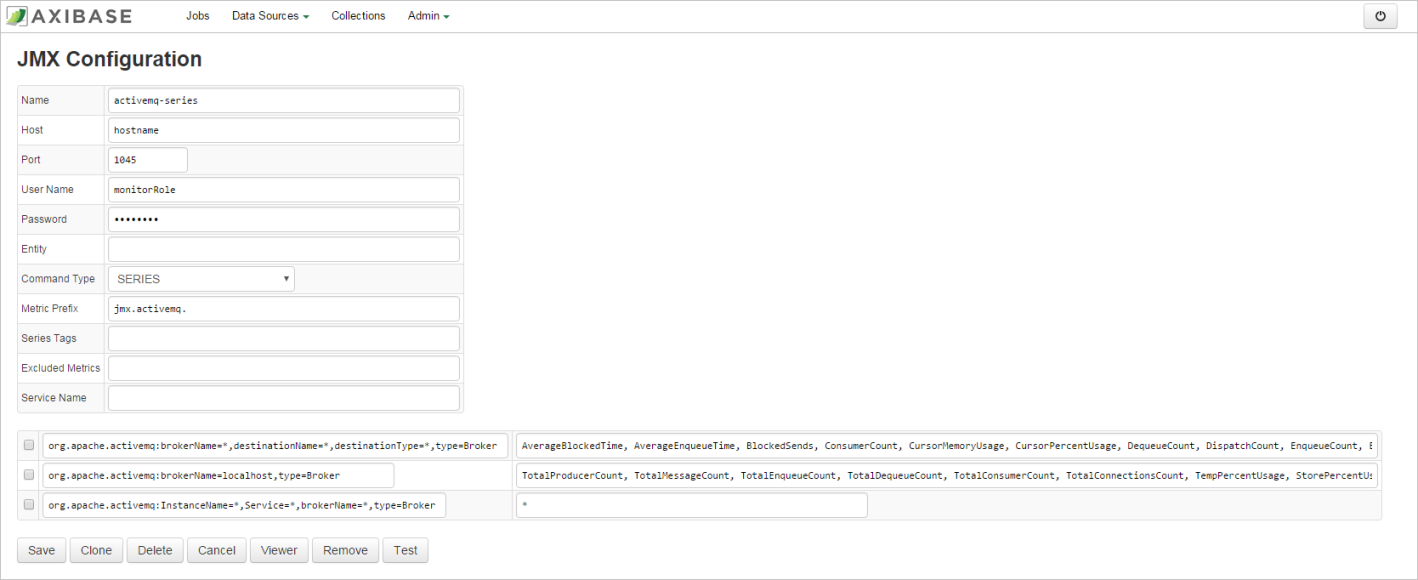
Configuring activemq-series
- Select the
activemq-seriesconfiguration. - On the JMX Configuration page, enter the JMX connection parameters as above:
Host — ActiveMQ hostname. Must be the same as the
activemq_hostname.Port — JMX port.
User Name — JMX user name such as
monitorRole. Read-only permissions are sufficient.Password — Password for JMX user.
Entity — Optionally, specify the output of the hostname command on the ActiveMQ server if hostname is different from
activemq_hostname(for example ifactivemq_hostnamerepresents a fully qualified name). Other parameters are optional. For more information on JMX configuration, see JMX.Host — ActiveMQ hostname. Must be the same as the
activemq_hostname.Port — JMX port.
User Name — JMX user name such as
monitorRole. Read-only permissions are sufficient.Password — Password for JMX user.
Entity — Optionally, specify the output of the hostname command on the ActiveMQ server if the hostname is different from
activemq_hostname(for example ifactivemq_hostnamerepresents a fully qualified name).
Other parameters are optional. For more information on JMX configuration, see JMX.
- Click Test to validate the configuration.
If the specified configuration is correct, there must be no errors or empty fields in the test results.
- Click Save.
Configuring activemq-property
- From the table on the JMX Job page, click Edit next to the
activemq-propertyconfiguration. - Set Host, Port, User Name, Password, and Entity fields as described in the previous section.
- Click Test to validate the configuration.
- Click Save.
Viewing Data in ATSD
Metrics
- List of collected ActiveMQ metrics
Properties
- List of collected Active MQ properties
Entity group
- Open Settings > Entity Groups, select Import from the split-button and upload activemq_entity_group.xml.
- Select the imported
apache-activemq-brokersgroup. - Verify that the group contains your Active MQ hosts.
Entity Views
- Open Entity Views > Configure, select Import from the split-button and upload activemq_entity_view.xml.
- Select the imported
Apache ActiveMQ Brokersview. - Select the Entity Group that you created earlier.
- Click View and browse information about your entities.

Portal
- Open the Portals menu and select Configure. Select Import from the split-button and upload activemq_portal.xml.
- Click the Assign link and associate the portal with the entity group you created earlier.
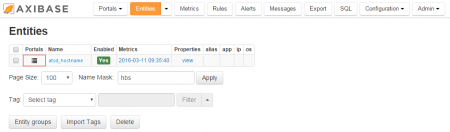
- Open the Entities tab, find the java application by name, and click the Portal icon.


Rules
Setting up Mail Client
- Configure Mail Client.
Import Rules
- Open the Configuration > Rules page, click Import and upload
jvm_rules.xml. - For each created rule, open the rule in the Rule Editor, and change the recipient address on the Email Notifications tab.
- These rules automatically apply to all JVM-based applications monitored by Axibase Collector.
Imported rules:
| Rule | Description |
|---|---|
| activemq_broker_configuration_change | Send a notification on configuration change. |
| activemq_connection_count | Raise an alert when connection count exceeds the specified threshold. |
| activemq_enqueue_stopped | Raise an alert when enqueueing stops (no new messages are received). |
| activemq_health_status | Raise an alert when Activemq health status is abnormal. |
| activemq_unauthorized_connection | Raise an alert when connection from unauthorized IP address is detected. |
To create your own rules, refer to Rule Engine documentation.